Manually Import CrowdStrike Falcon Events to Splunk
Do you use CrowdStrike Event search heavily? Do you come up against the 7-day data retention limit? Do you want to keep some data longer and still search it? This article explains how to manualy export events from CrowdStrike Falcon Event Search and then import that into Splunk for correlation, preservation, or further analysis.
Note: I will update this post with screenshots at a later date.
Detailed CrowdStrike events are only searchable for seven days for most customers. Whenever I have an investigation, the first thing I do is export ALL CrowdStrike events to a JSON file to preserve them. Recently, I wanted to load an old and complex investigation for review and training. But I wanted to show others how to search and interpret CrowdStrike fields. My solution was to load the JSON into Splunk: with a little custom configuration, the events look nearly identical in Splunk as they do in CrowdStrike Event Search.
I like CrowdStrike Falcon Event Search. It’s based on Splunk and I rely on it heavily when performing incident response, extracting observables for threat intelligence, and threat hunting. You can use the Falcon Data Replicator service to automatically import these events to Splunk, but that can get costly and duplicates the data. This may be beneficial for correlation at scale, but you might not have that option.
Step 1: Perform an Event Search in CrowdStrike
When my purpose for exporting CrowdStrike events is to preserve them, or to load them into Splunk for further analysis, I always export all events with no statistical summarization. This means no “|table” and no “|stats”. I want the native CrowdStrike event fields, and I want all of them.
However, there limits to how many records can be returned from a search. You cannot change these settings: they are set by CrowdStrike in their internal Splunk instance (Event Search is based on Splunk currently). For me, that limit is 50,000 events. The visual sign that your search did not return all records can be subtle and you might miss it.
My strategy to ensure I do miss any data is to perform one search per ComputerName per day. For most Windows endpoints that is under the limit. However, I have had investigations where I had to perform searches for 8 hour time ranges to keep the events until the search limit.
I also search by ComputerName not aid. Why not aid? Because some events like “DetectionSummary” do not have an aid. They only have ComputerName. I have found that all the events I want do have a ComputerName. If you know of events this will not catch, please email me and I will update this guide.
ComputerName="EVILCOMPUTER" earliest="3/22/2023:00:00:00" latest="3/23/2023:00:00:00"
That’s it. That’s the search. Of course, you can do any search. If you know what you are looking for and you have verified that all results were returned, and you don’t care about preserving all events, you can change this. You can also use the UI time-picker instead of earliest and latest. I prefered to be precise rather than depending on the UI.
Step 2: Export the results as JSON
Be aware that there are limits to how many records can be exported. Historically, I have had a few probably where large exports might fail. I have not experienced that in 2023.
From the event search page, look for the “down arrow” icon: this will export your search results. A dialog box will open asking you for the name of the export file and the format. I always name my files “YYYY-MM-DD-COMPUTERNAME.json” for clarity. Make sure you select JSON as the format: the default is CSV.
Note: there can be a long time between when you click “OK” and when the download starts.
Step 3: Configure a Splunk Datasource
Before you can import this into Splunk you will need to configure a source type. This configuration will ensure that the search-time field extraction works and produces the same field names you are used to in CrowdStrike event search. Note: these instructions do not result in indexed field extraction. If you come up an easy solution for that, please let me know.
- From the Setting Menu, select “Source Types”
- Select the “New Source Type” button
- In the Create Source Type dialog box enter the following
- Name: crowdstrike:result:json
- Description: CrowdStrike Event Search Export as JSON
- Destination app: “Search & Reporting” (I recommend you create an app specically to collect your custom source types)
- Category: Network & Security
- Indexed extractions: none (this is important)
- Event Breaks
- Event-breaking Policy: Regex
- Pattern: (}?[\r\n]*{“preview”:false(,”offset”:\d+)?,”result”:)
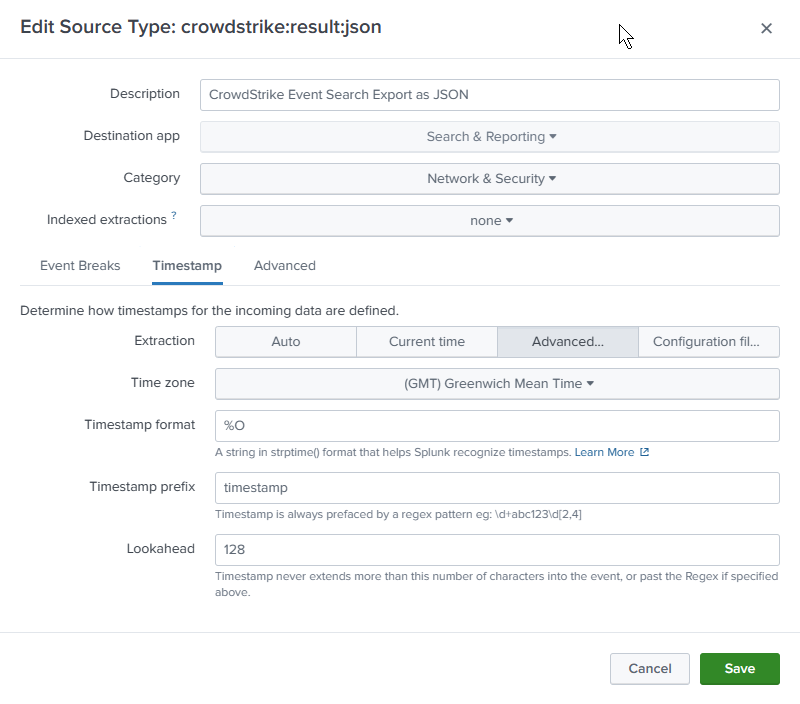
- Timestamp
- Extraction: Advanced
- Time zone: GMT
- Timestamp format: %O (BSD/Unix)
- Timestamp prefix: timestamp
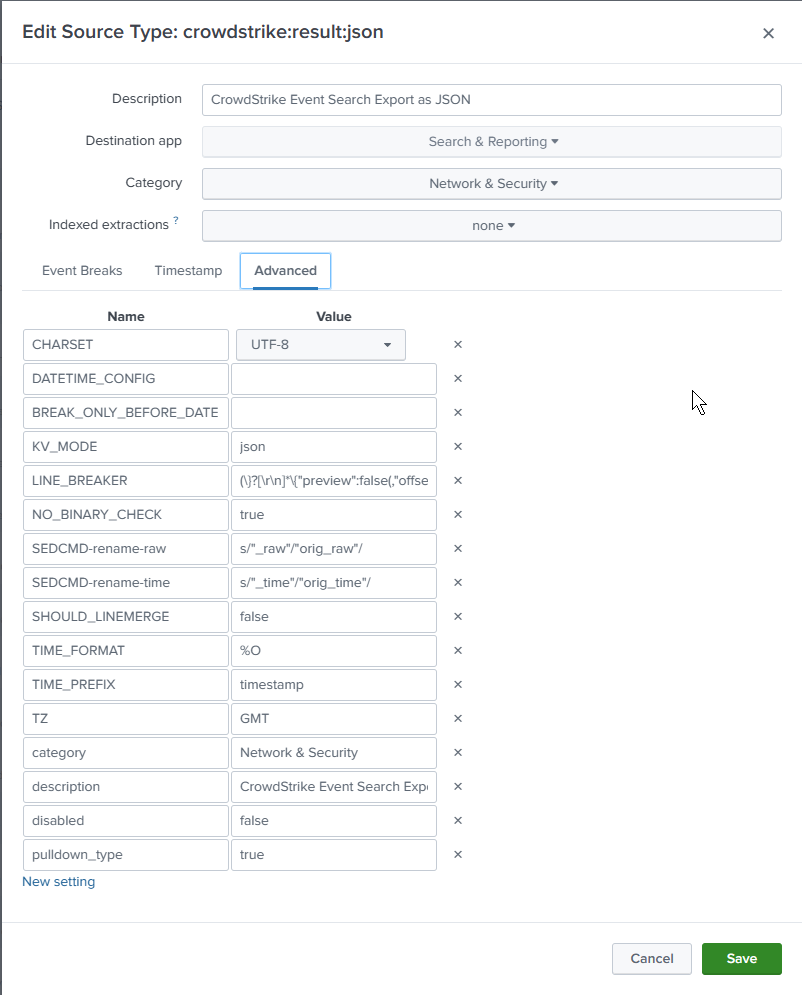
- Advanced
- Select “New Setting” 3 times
- KV_MODE: json
- SEDCMD-rename-raw: s/”_raw”/”orig_raw”/
- SEDCMD-rename-time: s/”_time”/”orig_time”/
- SEDCMD-rename-sourcetype: s/”sourcetype”/”orig_sourcetype”/
- SEDCMD-rename-eventtype: s/”eventtype”/”orig_eventtype”/
- SEDCMD-rename-splunkserver: s/”splunk_server”/”orig_splunk_server”/
- SEDCMD-rename-host: s/”host”/”orig_host”/
- SEDCMD-rename-source: s/”source”/”orig_source”/
- SEDCMD-rename-index: s/”index”/”orig_index”/
What do these settings do? Read below.
Event Breaks
This is the the part that really matters. When you export search results from CrowdStrike Event search, the JSON includes a “wrapper” around the results that I want to remove. You can import this very simply without my changes by setting “Indexed Extractions” to JSON. But you will get the prefix “result.” in from every field name.
To remove that we treat the JSON “wrapper” as a Line Breaker. That leaves us with just the search “result” fields and preserves the same field names we use in CrowdStrike.
(\}?[\r\n]*\{"preview":false(,"offset":\d+)?,"result":)
We are removing {"preview":false,"offset":2,"result": from every record. Sometimes “offset” is not present. And the \}[\r\n]* handles the very end of every record.
We have to specify “KV_MODE=json” in order to allow the JSON fields to be parse out at search time. We have to sacrifice index-time field extraction, but I find that acceptable given I don’t need to load a lot of data usually.
Timestamp
There are multiple timestamps in our exported JSON but we want the one called “timestamp” in BSD/Unix format. In Splunk that is %O.
Renaming conflicting fields
But this
Note for Splunk datasource developers: Setting “INDEXED_EXTRACTION=json” will give you fields that start with “result.” and while that is workable, I prefer not to have that. We don’t want the CrowdStrike “_raw” and “_time” fields clobbering the Splunk ones (which will be populated when the data is indexed by Splunk). The same is true of other standard Splunk fields that are added during indexing: host, splunk_server, source, sourcetype, and index.
That is where the two “SEDCMD” settings come in. These will search-and-replace the text (using sed syntax) before they are indexed.
Step 4: Import the JSON into Splunk
Be aware that there is a 500MB limit on manually uploaded data. However, if you exported at most 50,000 records following my earlier instructions, you should have files that are at most 100MB of JSON.
Now that you have created the sourcetype, you can import your CrowdStrike JSON file.
- In Splunk, from the Settings menu, select the “Add Data” icon on the left hand side.
- Select the “Upload” (files from my computer) icon
- Choose “Select File” and upload your file.
- Wait for the upload to finish
- On the “Set Source Type” page, select “Network & Security > crowdstrike:result:json” from the drop-down
- You should NOT see an orange exclaimation mark and the timestamps should be correctly extracted.
- Each record SHOULD NOT start with ‘{“preview”:’ (our sourcetype is working if this is stripped out)
- Select the “Next>” button at the top-right of the page
- Select an index. I recommend using an index that does not expire data.
- Select the “Next>” button
- Select the “Submit>” button
- Wait for the data to be imported
Step 5: Verify the events in Splunk are correct
You data is now loaded and you can search the index you stored it in for sourcetype=”crowdstrike:result:json”
A search like this should work now. You should be able to use the same fields you do in CrowdStrike Event Search.
index=crowdstrike sourcetype=crowdstrike:result:json
| table _time ComputerName event_simpleName CommandLine
Step 6: (Optional) Enrich with Splunk Enterprise Security
So why would we want to do this again? One reason is to preserve the data in a Splunk index for more than the 7 days that CrowdStrike supports. Another reason is to enrich the data using Splunk Enterprise Security or your own add-ons. In Splunk Enterprise Security, I have asset and identity data as well as enrichments for Threat Intelligence and more.
So, I might lookup how the ComputerName is categorized or find out if the UserName is a VIP or on a watchlist due to risky behaviour observed in other apps.
index=crowdstrike sourcetype=crowdstrike:result:json UserName=*
| lookup identity_lookup_ identity as UserName
| table _time UserName event_simpleName managedBy CommandLine